Google Apps Script で Gemini API を使う
今回は生成AIを利用するアプリ開発を体験します。 プログラムを書くのに使うのではなく、アプリの機能の一部として生成AIを利用します。
今回は無料枠があって教材として使いやすい Google の Gemini API を利用します。
事前準備(APIキーの作成)
Google AI Studio にアクセスして、Google アカウントでログインします。 ログインしたら、左側のメニューから「API キー」を選択し、「API キーを作成」ボタンをクリックして新しい API キーを作成します。 Google Cloud Platform のプロジェクトを選択または作成するように求められますが、適当な名前のプロジェクトを新規作成して選択してください。
APIキーはAPIを利用するための認証情報で、自動生成したパスワードのような長い文字列です。公開してしまわないように注意してください。
API キーをスクリプトプロパティに保存する
APIキーが準備できましたら Google Apps Script のプロジェクトを新規作成し、エディタを開いてください。 作成したAPIキーを使いやすいように Google Apps Script のスクリプトプロパティに追加します。
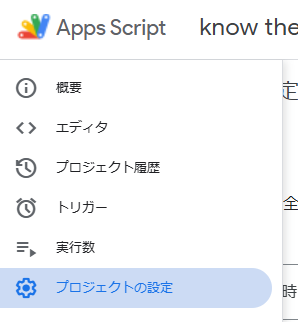
プロジェクトの設定を開きます。
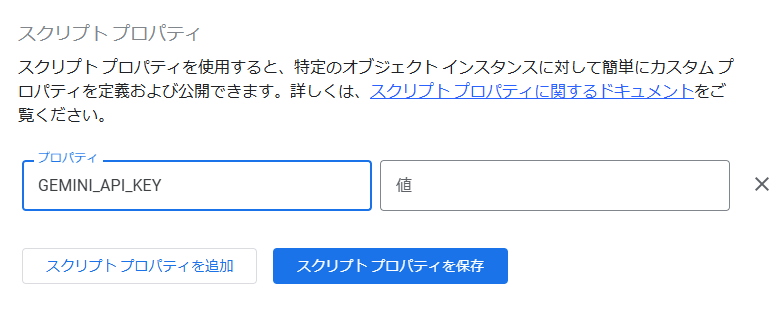
スクリプトプロパティのセクションまでスクロールし、「スクリプトプロパティを編集」ボタンをクリックします。
キーを「GEMINI_API_KEY」、値に先ほど作成したAPIキーを入力して「スクリプトプロパティを保存」をクリックします。
保存が完了したら、メニューの「エディタ」をクリックしてエディタに戻ります。
Gemini API の呼び出し方法
Gemini API を呼び出すには HTTP リクエストを送信しますので UrlFetchApp を利用します。 URL には使いたいモデル名と API キーを含めます。 具体的には以下のようなコードになります。
URL の文字列を組み立てる部分ではバッククォート
`を使っています。 JavaScript で文字列を扱うときは普通シングルクォート'やダブルクォート"を使いますが、バッククォートを使うと文字列の中に変数を埋め込むことができるので便利です。
const apiKey = PropertiesService.getScriptProperties().getProperty("GEMINI_API_KEY");const gemini = 'gemini-2.5-flash';const geminiUrl = `https://generativelanguage.googleapis.com/v1beta/models/${gemini}:generateContent?key=${apiKey}`;function callGemini(parts, schema){const payload = {contents: [ { parts } ],generationConfig: {response_mime_type: "application/json",response_json_schema: schema}};const options = {method: 'post',contentType: `application/json`,payload: JSON.stringify(payload)};const response = UrlFetchApp.fetch(geminiUrl, options);const data = JSON.parse(response);return data.candidates[0];}
callGemini(parts, schema) 関数は Gemini API を呼び出して結果を返す関数で、そのまま使いまわしていただくことができるように作っています。
引数 parts にはプロンプト(指示文)を、schema には結果のスキーマ(形式)を指定します。
プロンプトの作り方やスキーマの指定方法についてはこの後説明します。
レート制限とモデル選び
Gemini API にはレート制限があります。
たとえば上の例で使っている "gemini-2.5-flash" モデルの場合、無料で利用できるのは 1 分あたりのリクエスト数は 5 回まで、1 日あたりのリクエスト数は 20 回までとなっています(2026 年 1 月現在)。
あっという間に使い切ってしまいそうな回数です。有料プランに加入するとレート制限が緩和されますが、呼び出しごとに料金が発生しますので注意してください。
レート制限はモデルごとに異なり、基本的には性能が高いモデルほどレート制限が厳しくなります。 特に性能が求められない場合や練習中は、よりレート制限の緩いモデルを選ぶのも手です。
2026 年 1 月現在、Gemma というオープンなモデルが公開されており、無料枠でもかなりの回数を利用できます。
以下に Gemma モデルを利用する場合のコードを示します。
const apiKey = PropertiesService.getScriptProperties().getProperty("GEMINI_API_KEY");const gemma = 'gemma-3-4b-it';const gemmaUrl = `https://generativelanguage.googleapis.com/v1beta/models/${gemma}:generateContent?key=${apiKey}`;const geminiUrl = `https://generativelanguage.googleapis.com/v1beta/models/${gemini}:generateContent?key=${apiKey}`;function callGemma(parts){const payload = {contents: [ { parts } ],};const options = {method: 'post',contentType: `application/json`,payload: JSON.stringify(payload)};const response = UrlFetchApp.fetch(gemmaUrl, options);const data = JSON.parse(response);return data.candidates[0];}
先ほどのコードとほとんど同じですが、モデル名が異なることに加え、スキーマを指定していない点が異なります。 Gemma モデルではスキーマの指定がサポートされていないためです。 スキーマが指定できるメリットはとても大きいのすが、レート制限の厳しいモデルでしか利用できないのが残念なところです。詳しくは後述します。
サンプル:日本文化の説明(単語)
それでは実際に Gemini API を呼び出してみましょう。
ある単語について日本文化の観点から説明するサンプルコードを以下に示します。
メニューバーから testDescribeWord 関数を選んで実行してみてください。
スクリプトプロパティの設定等が正しく行われていれば、コンソールに説明文が表示されるはずです。
function testDescribeWord(){describeWord("恵方巻");}function describeWord(word){const text = `You are a person who is very knowledgeable about Japanese culture.You are asked to explain the word ${word}.Explain the word and Japanese culture through it, in a friendly, conversational tone.Guidelines:- Use natural, spoken English- Explain it in ONE or TWO short sentences.- Keep it casual and friendly, like talking to a friend- Do not sound like a textbook or tour guide- Avoid overly technical terms- If there is no Japanese aspect, say so honestly instead of forcing an explanation`const parts = [{ text: text }];const result = callGemma(parts);// const result = callGemini(parts);console.log(result.content);return result.content;}
プロンプトは目的をAIチャットに伝えて生成してもらったものを使っています。サボりたいわけではなくて基本そうした方がうまくいきやすいからです。 変数
wordを埋め込むことや読みやすく改行したまま使うことを目的としてバッククォート`で囲む方法を使っています。
このくらいの例でしたら Gemma モデルで十分に対応できますが、 Gemini モデルとも比較してみると面白いでしょう。
試してみたい方はコード中の callGemma(parts) と callGemini(parts) のコメントを入れ替えて実行してみてください。
サンプル:日本文化の説明(画像)
Gemini API では画像を含むプロンプトも送信することができます。 ここでは画像に含まれる日本文化の要素について説明するサンプルを見ていきましょう。
画像を含むプロンプトを作成するには画像を文字列に変換して送信する方法が簡単です。 文字列の変換には Base64 エンコードと呼ばれる方法を用います。 たとえば Google Apps Script では以下のようにして Google ドライブに保存されている画像を Base64 エンコードされた文字列に変換できます。
function getImageAsBase64(fileId) {try {const file = DriveApp.getFileById(fileId);const imageBlob = file.getBlob();const imageBytes = imageBlob.getBytes();const data = Utilities.base64Encode(imageBytes);const mimeType = imageBlob.getContentType();return { mime_type: mimeType, data };} catch (e) {console.error("Error reading image from Google Drive: " + e.toString());return null;}}
それでは実際に画像を含むプロンプトを Gemini API に送信してみましょう。 まずは Gemma モデルを使ったサンプルコードを以下に示します。
コード中の imageFileId には Google ドライブに保存されている画像ファイルのIDを入力してください(ハイライト部1)。
画像ファイルのIDを調べるには、Google ドライブで画像ファイルを右クリックして「アプリで開く」「新しいタブで開く」を選び、表示されたURLの中から "https://drive.google.com/file/d/" と "/view" の間にある部分をコピーしてください。
画像IDが入力できたらメニューバーから testDescribeImageGemma 関数を選んで実行してみてください。
const imageFileId = 'ここに画像ファイルのIDを入力してください';function testDescribeImageGemma(){const image = getImageAsBase64(imageFileId);describeImageGemma(image);}const prompt = `You are a person who is very knowledgeable about Japanese culture.You are going out together with the user, casually walking around and looking at things through the camera.When an image is provided, look for elements related to Japanese culture in the image(such as buildings, streets, signs, food, clothing, religious objects, seasonal details, or everyday customs).Explain what you notice in a friendly, conversational tone, as if you are saying:“Hey, look at that,” or “See that over there?”Guidelines:- Use natural, spoken English- Explain it in ONE or TWO short sentences.- Keep it casual and friendly, like talking to a friend- Do not sound like a textbook or tour guide- Avoid overly technical terms- If you are not completely sure, say things like “It looks like…” or “This might be…”- If there are no clear Japanese cultural elements, say so honestly instead of forcing an explanationYour explanation should feel like:A culturally knowledgeable companion pointing something out during a walk.`function describeImageGemma(image){const parts = [{ inline_data: image },{ text: prompt }];const result = callGemma(parts);console.log(result.content);return result.content;}
文字列に変換した画像データは text とは分けて inline_data プロパティとして渡す必要があります(ハイライト部分2)。
スキーマを指定する
画像の分析結果から「何がどこにあるか」の情報を抜き出すことができれば、画像に目印を付けるなどの応用が可能になりますが、 複数の情報が入り混じった生成AIの出力文字列から必要な情報を抜き出すのは簡単ではありません。 生成AIの出力には確率的挙動があり、同じプロンプトを用いても同じ形式の文字列が返ってくるとは限らないためです。
安定した形式で結果を得る手法として Gemini API ではスキーマ指定がサポートされています。 指定されたスキーマを用いて生成AIの出力確率を制御することで、安定した形式での出力を実現しているそうです。
以下に Gemini モデルを用いてスキーマを指定するサンプルコードを示します。
メニューバーから testDescribeImageGemini 関数を選んで実行してみてください。
function testDescribeImageGemini(){const image = getImageAsBase64(imageFileId);describeImageGemini(image);}function describeImageGemini(image){const parts = [{ inline_data: image },{ text: prompt }];const schema = {type: "object",properties: {elements: {type: "array",description: "Elements found in the picture with its bounding-box.",items: {type: "object",properties: {name: { type: "string" },explanation: { type: "string" },x: { type: "number", description: "Normalized x-coordinate of the top-left corner (0.0 to 1.0)." },y: { type: "number", description: "Normalized y-coordinate of the top-left corner (0.0 to 1.0)." },w: { type: "number", description: "Normalized width of the bounding box (0.0 to 1.0)." },h: { type: "number", description: "Normalized height of the bounding box (0.0 to 1.0)." }},required: ["name", "explanation", "x", "y", "w", "h"]}}}}const result = callGemini(parts, schema);console.log(result.content);return result.content;}
サンプル:日本文化解説ウェブアプリ
ここまでに作ったコードを組み合わせて、画像に含まれる日本文化の要素について解説するウェブアプリを作成してみましょう。
まずは doGet() 関数を以下のように作成して、HTML ファイル app.html を読み込むようにします。
function doGet(){const template = HtmlService.createTemplateFromFile("app");return template.evaluate().addMetaTag('viewport', 'width=device-width, initial-scale=1');}
addMetaTag メソッドはスマートフォンで見やすくするための設定です。
次に HTML ファイル app.html を新規作成し、以下のようにコードを記述します。
デプロイしてウェブアプリを開いてみてください。
かなり長いコードになりますが、少しでも読みやすくなるよう機能ごとにコメントを入れてセクション分けしています。 下でセクションごとに説明を加えますので、まずは全体をざっと眺めてみてください。
<!DOCTYPE html><html><head><base target="_top"><style>body { font-family: sans-serif; max-width: 800px; margin: 0 auto; padding: 20px; text-align: center; }#video { display: block; width: 100%; height: auto; max-width: 640px; }#cameraWrapper { position: relative; display: block; margin: 0 auto; background: #000; border-radius: 8px; overflow: hidden; width: 100%; max-width: 640px; }#overlayCanvas { position: absolute; top: 0; left: 0; width: 100%; height: 100%; pointer-events: none; }button { padding: 10px 20px; margin: 5px; cursor: pointer; border-radius: 5px; border: none; background: #007bff; color: white; }button:hover { background: #0056b3; }#wordInput { padding: 10px; width: 60%; }#status { display: block; margin: 10px 0; color: #666; font-style: italic; }</style></head><body><h1>Describe Japanese Culture</h1><div><input id="wordInput" type="text" placeholder="例:おしぼり,もったいない…"></input><button id="askWordButton">Ask</button></div><div id="cameraWrapper"><video id="video" autoplay playsinline></video><canvas id="overlayCanvas"></canvas></div><canvas id="captureCanvas" style="display: none"></canvas><div><button id="switchButton">Switch Camera</button><button id="startButton">Start Camera</button><button id="geminiButton">Ask Gemini</button><button id="gemmaButton">Ask Gemmma</button></div><div><span id="status">Status: start</span></div><script>const status = document.getElementById("status");const wordInput = document.getElementById("wordInput");const video = document.getElementById("video");const canvas = document.getElementById("captureCanvas");const overlayCanvas = document.getElementById("overlayCanvas");const askWordButton = document.getElementById("askWordButton");const switchButton = document.getElementById("switchButton");const startButton = document.getElementById("startButton");const gemmaButton = document.getElementById("gemmaButton");const geminiButton = document.getElementById("geminiButton");askWordButton.addEventListener("click", askWord);switchButton.addEventListener("click", switchCamera);startButton.addEventListener("click", startCamera);gemmaButton.addEventListener("click", askImageGemma);geminiButton.addEventListener("click", askImageGemini);////////////////////////////////////////////////////////////////////////////////////////////////////// AI usage with text only propmt////////////////////////////////////////////////////////////////////////////////////////////////////function askWord(){const word = wordInput.value;if(!word){status.textContent = "Please input any word.";return;}status.textContent = "Waiting for an explanation of word: " + word;google.script.run.withSuccessHandler(explanationReceived).describeWord(word);}function explanationReceived(data){console.log(data);const text = data.parts[0].text;status.textContent = "Explanation received: " + text;window.speechSynthesis.cancel();const utterance = new SpeechSynthesisUtterance(text);utterance.lang = "en-US";utterance.rate = 1.1;window.speechSynthesis.speak(utterance);}////////////////////////////////////////////////////////////////////////////////////////////////////// AI usage with image data////////////////////////////////////////////////////////////////////////////////////////////////////let currentFacingMode = "environment";async function switchCamera() {currentFacingMode = (currentFacingMode === "user") ? "environment" : "user";if (video.srcObject) {video.srcObject.getTracks().forEach(track => track.stop());}startCamera();}async function startCamera(){try {const constraints = {video: { facingMode: currentFacingMode }};const stream = await navigator.mediaDevices.getUserMedia(constraints);video.srcObject = stream;video.onloadedmetadata = () => {overlayCanvas.width = video.videoWidth;overlayCanvas.height = video.videoHeight;canvas.width = video.videoWidth;canvas.height = video.videoHeight;status.textContent = `Camera: ${currentFacingMode} (${video.videoWidth}x${video.videoHeight})`;};} catch(err){console.error(err);status.textContent = "Camera Error: " + err.message;}}function askImageGemma(){const data = getImageData();google.script.run.withSuccessHandler(explanationReceived).describeImageGemma({ data, mime_type: "image/jpeg" });status.textContent = "Waiting for explanation...";}function askImageGemini(){const data = getImageData();google.script.run.withSuccessHandler(geminiReceived).describeImageGemini({ data, mime_type: "image/jpeg" });status.textContent = "Waiting for detailed explanation using Gemini...";}function getImageData(){const context = canvas.getContext("2d");context.drawImage(video, 0, 0, canvas.width, canvas.height);return canvas.toDataURL("image/jpeg", 0.5).split(",")[1];}function geminiReceived(data){status.textContent = "Gemini result received.";console.log(data);const text = data.parts[0].text;const elements = JSON.parse(text).elements;speakElements(elements);}////////////////////////////////////////////////////////////////////////////////////////////////////// Speak and show elements one-by-one////////////////////////////////////////////////////////////////////////////////////////////////////let speechQueue = [];let currentIndex = 0;let isSpeaking = false;function speakElements(elements){window.speechSynthesis.cancel();speechQueue = elements;currentIndex = 0;isSpeaking = false;speakNext();}// Speak/show an element and issue the next taskfunction speakNext() {if (currentIndex >= speechQueue.length) {isSpeaking = false;highlightElement(null);return;}const element = speechQueue[currentIndex];isSpeaking = true;highlightElement(element);const utterance = new SpeechSynthesisUtterance(element.explanation);utterance.lang = "en-US";utterance.rate = 1.1;utterance.onend = () => {currentIndex++;speakNext();};window.speechSynthesis.speak(utterance);}// Show an elementfunction highlightElement(e) {if(!e) return;const overlayCtx = prepareCanvasContext();// Convert normalized coordinates (0.0 to 1.0) to pixel valuesconst canvasW = overlayCanvas.width;const canvasH = overlayCanvas.height;const x = e.x * canvasW;const y = e.y * canvasH;const w = e.w * canvasW;const h = e.h * canvasH;// Draw bounding-box rectangleoverlayCtx.strokeStyle = "rgba(255, 0, 0, 0.8)";overlayCtx.lineWidth = 2;overlayCtx.strokeRect(x, y, w, h);// Draw labelconst padding = 6;overlayCtx.font = "14px sans-serif";const text = e.name || e.explanation;const textWidth = overlayCtx.measureText(text).width;overlayCtx.fillStyle = "rgba(0, 0, 0, 0.6)";overlayCtx.fillRect(x, y - 22, textWidth + padding * 2, 20);overlayCtx.fillStyle = "white";overlayCtx.fillText(text, x + padding, y - 7);}function prepareCanvasContext(){const overlayCtx = overlayCanvas.getContext("2d");const rect = overlayCanvas.getBoundingClientRect();if (overlayCanvas.width !== rect.width || overlayCanvas.height !== rect.height) {overlayCanvas.width = rect.width;overlayCanvas.height = rect.height;}overlayCtx.clearRect(0, 0, overlayCanvas.width, overlayCanvas.height);return overlayCtx;}</script></body></html>
セクション: AI usage with text only propmt
ウェブアプリで Gemini API を使う場合、Gemini API を呼び出している Google Apps Script 関数を google.script.run 経由で呼び出します(ハイライト部1)。
describeWord(word) 関数は単語説明用の関数をそのまま使っています。
function askWord(){const word = wordInput.value;if(!word){status.textContent = "Please input any word.";return;}status.textContent = "Waiting for an explanation of word: " + word;google.script.run.withSuccessHandler(explanationReceived).describeWord(word);}function explanationReceived(data){console.log(data);const text = data.parts[0].text;status.textContent = "Explanation received: " + text;window.speechSynthesis.cancel();const utterance = new SpeechSynthesisUtterance(text);utterance.lang = "en-US";utterance.rate = 1.1;window.speechSynthesis.speak(utterance);}
explanationReceived 関数は Google Apps Script 側からの結果を受け取っています。
受け取った説明文を画面に表示するとともに、Web Speech API を使って音声で読み上げています(ハイライト部2)。
セクション: AI usage with image data
(長くなりましたのでカメラの準備については説明を省略します)
以下に抜粋する getImageData() 関数はカメラ映像から画像データを取得して Base64 エンコードされた文字列に変換しています。
function getImageData(){const context = canvas.getContext("2d");context.drawImage(video, 0, 0, canvas.width, canvas.height);return canvas.toDataURL("image/jpeg", 0.5).split(",")[1];}
これで先ほどと同様に画像を含むプロンプトを Gemini API に送信する準備ができました。
google.script.run 経由で Google Apps Script 側の describeImageGemma(image) 関数や describeImageGemini(image) 関数を呼び出しています。
セクション: Speak and show elements one-by-one
スキーマ指定を利用した describeImageGemini(image) 関数の結果を受け取る geminiReceived(data) 関数では、
要素の位置情報が抽出できていることを利用して、画像上に要素の位置を示す目印を表示しながら説明文を音声で読み上げる処理を行っています。
(これも長くなりましたので詳細は省略します)
まとめ
今回は Google Apps Script で Gemini API を利用する方法を見てきました。
生成AIを使うアプリの案はたくさん考えられますので、ぜひ色々試してみてください。 何も思いつかないという人もまずは今回のサンプルのプロンプトを少し変えてみるところから始めてみてはいかがでしょうか。